How to Design a Curbless Walk-in Shower
A potential client (she is in her early seventies) recently shared with me that her contractor would not hear of a curbless walk-in shower. He talked her out of it. As DIY Ally, I would like to make a case for it. It’s quite doable and is certainly worth the effort.
The most important feature of a curbless walk-in shower is that it does not present an accessibility challenge. In addition, when the shower floor is aligned and flush with the rest of the bathroom, it is easier to clean.
A curbless walk-in shower can work with or without a door
It depends on how the showerheads are arranged. Preferrably, a fixed showerhead should be placed where it can be aimed away from the shower entry. Containing water so that it does not seep into the subfloor or splash out of the unit is the key design challenge. Very careful attention must be paid to the floor transition and other water-retention strategies.
Overall shower unit size — length and depth are critical for water control. The larger the shower, the easier it is to gradually slope the shower floor to the drain and contain water. 36” should be considered the minimum depth for any curbless shower. A depth of 42” is a significant improvement and 48” is even better.

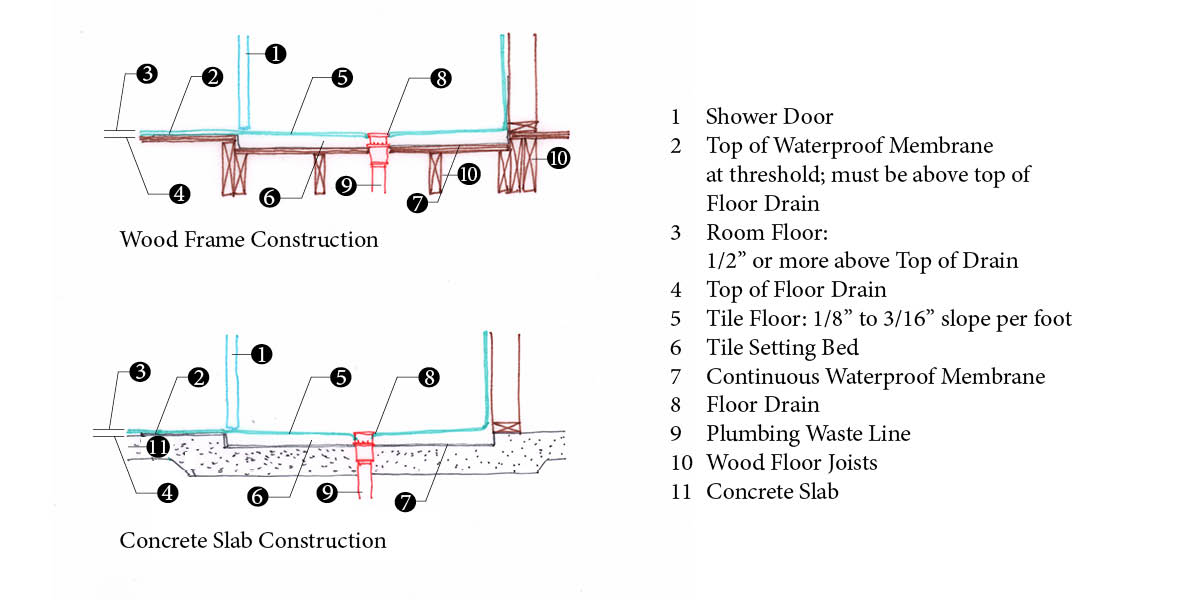
Flush transition between the room and the shower floor requires a recessed subfloor in the shower area. The shower floor must be sloped sufficiently for the water to flow toward the drain and away from the entry.
That means that in the case of wood framing, the subfloor is lowered and supporting joists are either dropped (if there is enough room) or resized and spaced to adequately support the floor. Additional framing members should surround the floor recess as necessary for support.
Attention must be paid to waterproofing and detailing
A setting or mortar bed is recommended under the entire shower area and must be sufficiently deep so it may be sloped to the drain. Usually, this requires that the floor is recessed between 1 ½” to 2” for the minimum size.
The top of the drain must be set below the subfloor of the room
For concrete floor construction, the slab must be poured initially with a recess to accept the shower. This video tutorial shows how to create a 1 ¼” deep recess in the existing concrete floor by cutting and chipping out concrete. It’s actually quite easy and does not take more than an hour including cleanup!
In both wood frame and concrete slab construction, a waterproof membrane should be used to form the bottom of the shower “pan.” And should extend up into the surrounding walls and out into the floor area adjacent to the shower.
The installation of “two-stage” or similar drains with weep holes is recommended to allow any water absorbed by the setting bed to seep into the drain. The drain in a curbless walk-in shower does not have to be in the middle. Linear drains can be placed along any edge. If the floor is gently and unnoticeably sloped, 1/8” to 3/16” per foot, the water can be directed to a side or a corner.
A curbless walk-in shower floor area might benefit from a smaller-scale tile. The increased grout surface will give more grip and make the wettest area of your home less slippery.
SHARE
Post a Comment
You must be logged in to post a comment.


Mia Kazovsky
Do you think the contractor was against the idea of a curbless walk-in shower because it is more challenging for him? If so, that is very disappointing and your potential client is very lucky to have you as an ally. DIY Ally, of course! You are such a great resource to DIYers because you will never sacrifice design, you are a problem solver, and you never hesitate to think outside of the curb (haha)!!
Alla DIY Ally
Haha!!! You are so kind! Love you, Mia!!!!